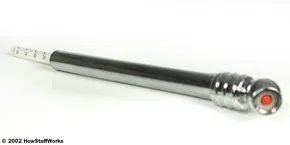
You have one. It’s likely in your glovebox, rattling around in a drawer, or tucked into a center console. That pen-sized plastic stick with the sliding scale. You trust it to tell you if your tires are safe or if you’re driving on a pancake. But have you ever stopped to wonder how it measures pressure without exploding? Why doesn’t the mechanism just blow out the end?
The answer lies in simple physics. Specifically, it’s about how we define pressure and how a spring fights back.
Understanding Pressure
Let’s strip away the jargon for a second. Pressure is just force applied over an area. Imagine a 1-inch by 1-inch piece of wood, 3 feet long, weighing exactly 1 pound. Stand it on end on your toe. You’re feeling 1 pound per square inch (psi). Scale that up. If that same column of wood were 30 feet tall, it would exert 10 psi on your foot. 300 feet? 100 psi.
Water works the same way. A column of water just 1 foot deep exerts about 0.43 psi. Go down a mile underwater, and you’re looking at roughly 2,270 psi. That’s a 1-inch square column of water a mile high weighing 2,270 pounds.
Air behaves identically. The atmosphere is about 50 miles “deep.” At sea level, the weight of that air column presses down with 14.7 psi. Our bodies are pressurized to this same level, so we don’t feel crushed.
This pressure changes as you go up.
– Sea level: 14.7 psi
– 10,000 feet: 10.2 psi
– 20,000 feet: 6.4 psi
– 30,000 feet: 4.3 psi
– 40,000 feet: 2.7 psi
– 50,000 feet: 1.6 psi
“Our bodies think 14.7 psi of air pressure is completely normal.”
Exerting Pressure
So how does air push back? It’s atomic. Inside a tire or a balloon, gas atoms are in constant, chaotic motion. They ricochet off the container walls. The speed of these atoms depends on temperature. At absolute zero (0 Kelvin), motion stops. Higher temperatures mean faster atoms. Faster atoms hit harder and more often.
There are only two ways to increase pressure inside a sealed container:
– Raise the temperature: Hotter atoms move faster, hitting the walls with more force.
– Add more atoms: Stuff more gas in, get more collisions, get higher pressure.
When you pump up a tire, you aren’t adding heat (well, not intentionally). You are forcing more air molecules into a constant volume. A car tire typically runs at 30 psi. A bike tire? 60 to 100 psi. The pump simply shoves more atoms into the same space. The pressure rises because there are more atoms banging against the rubber.
Inside the Pressure Gauge
Now, look at that little pin gauge again. You push the nozzle onto your valve stem. Air rushes in. Where does it go? It doesn’t just fill a void. It pushes against a spring.
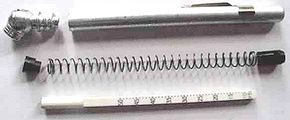
The gauge is essentially a closed tube with a spring-loaded piston inside. One end connects to your tire. The other end is capped, but the piston can slide. When you press the gauge onto the valve, air from the tire enters the gauge’s internal chamber. This air pressure pushes against the piston, compressing the spring.
The sliding scale on the outside of the gauge is mechanically linked to the piston. As the spring compresses under the force of the tire’s air pressure, the piston moves inward. The scale moves with it. The number that lines up with the edge of the gauge housing? That’s the pressure.
It’s a direct mechanical translation. Force equals pressure times area. The spring has a known resistance. The piston has a known area. The math is done by the compression.
Why doesn’t the scale blow out? Because the spring is rated for significantly more force than the air can exert. A 35 psi tire isn’t going to generate enough force to overcome the spring’s tension and eject the mechanism. The spring acts as a counterweight, balancing the air pressure until equilibrium is reached.
But there’s a catch. These cheap gauges are notoriously inconsistent. Why? Friction. The piston has to slide. Dirt, grit, and wear create resistance. If the piston sticks, the reading is wrong. That’s why many enthusiasts swear by
How to Read a Tire Pressure Gauge Correctly
Most mechanical gauges follow the same basic layout. You have a body, a nozzle, and a dial or stick that moves. The mechanics are simple. If you know how tires work, you know they rely on consistent pressure. Getting that number right requires three distinct steps.
First, find your footing. You need a stable stance. Wobbling while holding the gauge introduces error. Stand firm.
Next, push the gauge onto the valve stem. You must create an airtight seal. This is where the physics happen. Inside the gauge, a small plunger depresses the core pin inside the valve stem. Air rushes out from the tire into the gauge’s internal chamber. You hear it. That hiss is the tire equalizing with the gauge.
The pin inside the gauge presses against the valve pin inside the valve stem to release air from the tire.
Once the airflow stops, the mechanism settles. Read the display. If it’s a stick gauge, look at the protruding rod. For dial gauges, check the needle. That number is your static pressure. Ignore it if you hear hissing. Wait for the silence. Then record the figure.
The Mechanics of the Gauge
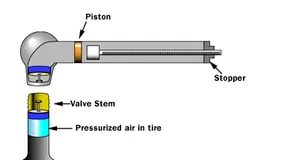
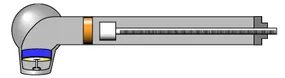
The heart of this pressure gauge isn’t some complex digital sensor. It’s a simple tube. Inside that tube sits a small, tight-sealing piston. Think of it like the plunger in a bicycle pump. The tube’s interior is polished to a smooth finish. That reduces friction. The piston itself is made of soft rubber. It conforms to the walls, creating an airtight seal. A light oil lubricates the space between the rubber and the glass. It keeps things moving smoothly.
Look at the image. The piston is pinned at one end. At the other end sits a stop. This limits travel. It prevents the piston from shooting out completely. Running the entire length of the tube is a spring. It’s compressed between the stop and the piston. This tension pushes the piston toward the left-hand side of the tube. Constant pressure. Constant readiness.
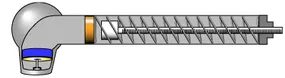
The funny little sphere on the left isn’t just decoration. It’s hollow. That opening there? It’s built to lock onto your tire’s valve stem. Look inside, and you’ll spot a rubber seal and a small fixed pin.
The rubber seal presses against the valve stem’s lip. This stops air from leaking while you measure. The pin does the heavy lifting for flow. It depresses the valve pin inside the stem, opening the gate. Air rushes around that pin, travels through the hollow sphere, and hits the piston chamber.
Once the gauge is seated, pressurized air from the tire floods in. It pushes the piston to the right. The distance it travels? That’s your pressure reading.
Air pushes right. The spring pushes left. It’s a tug-of-war inside a tube.
Let’s say this gauge tops out at 60 psi. The spring is calibrated for that limit. At 60 psi, the piston hits the far-right stop. At 30 psi? Halfway. Linear. Predictable.
Release the gauge, and the air stops. The spring snaps the piston back to zero instantly.
To read the result, there’s a calibrated rod inside the tube:
How Analog Tire Gauges Hold Their Reading
Look closely at the mechanism. There’s no visible spring in the diagram, but the physics are simple. The calibrated rod fits snugly inside the spring housing. It doesn’t lock to the piston. They slide against each other with a tight fit against the stop.
Push the gauge onto the valve stem. The piston moves right. It shoves the calibrated rod along with it. You feel the resistance. You let go. The piston retracts, sliding back to the left. But the rod? It stays put. It holds the maximum position you just measured. This allows you to step back and read the number without losing the data.
The rod stays in its maximum position to allow you to read the pressure.
It’s a clever, low-tech solution. No batteries. No digital drift. Just physics. If you want to dig deeper into how these tools work, there are plenty of resources waiting.
Tire Pressure Gauge FAQ
Why is my tire pressure light on when my tires are fine?
Cold weather is a culprit. As temperatures drop, so does internal pressure. The light might turn off after a drive as the tires warm up and pressure equalizes. But don’t guess. Check the pressure with a gauge. Make sure it’s safe to drive.
Why is my tire pressure light on?
Usually, it means your pressure is outside the recommended range. It’s a warning, not a diagnosis. Verify with a manual check.
Where are JACO tire gauges made?
Quality control matters. All JACO products are manufactured and tested in the U.S. Domestic production ensures specific standards are met.
Does Walmart sell tire pressure gauges?
Yes. You can find them on Walmart’s website. It’s a convenient option for basic tools.
What should my tire pressure gauge read?
Tire Pressure Monitoring Systems (TPMS) have a programmed range of acceptable circumstances. For direct monitoring, this is often between 28 and 35 psi. If your gauge reads outside this band, investigate further.